
The above diagram is the basic interface of the Marketplace text changer
Notes:
The Marketplace text changer has been created to work with the SIGIL roleplaying system. Whereas the SIGIL online board require that you enter text coded in HTML format, the Marketplace text changer allows you to enter text and format it using a number of different typeface variations such as Bold and Italic.
By clicking on the Copy and convert button, the formatted text is interpretted and an HTML version created and copied automatically to the clipboard, this eliminates the risk of forgetting to use linefeeds or close HTML tags
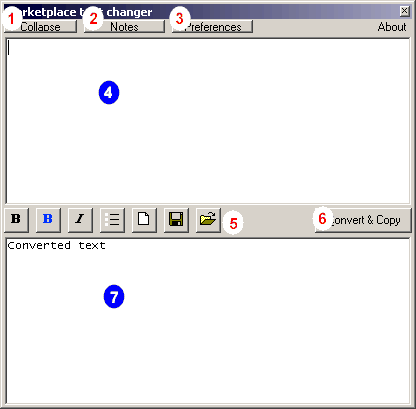
Explanation of buttons:
The Marketplace text changer has been written to automatically stay on top of all other windows, however this can quickly become annoying. By clicking on the Collapse button the window is shrunk down into a more acceptable slim version

Clicking on the collapse button again will expand the window out to its full size once more.
This element of the Marketplace text changer was added during version 0.4. Upon clicking on this button, will bring up the Notes element of the program.
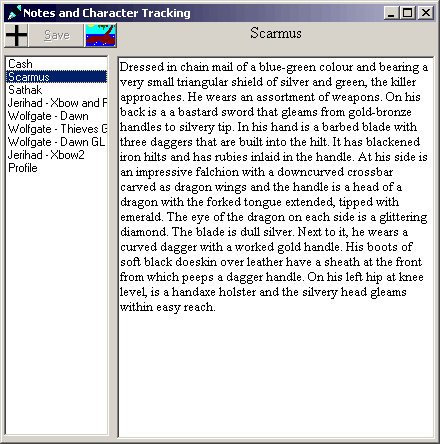
Explanation of buttons:
1 - Add new item
2 - Save changes to current item
3 - Pack and Go
4 - The item listing
5 - The current item
To add a new note click the '+' icon (1), you will be asked to name your new item, once done this will appear within the item listing (4)
By clicking the left-mouse-button on an item, the contents of this item will appear in the right-hand panel (5). The clicking the right-hand-button on an item will bring up a number of options;
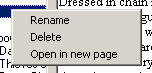
Rename - Rename the items description
Delete - Deletes the item
Open in new window - Opens this item up into a new uneditable window
The Pack and Go option will allow you to send all of the items within your list to the floppy disk drive (A:). Clicking on this button will pull up a sub-menu;

Pack and Go will send the items to the floppy drive, whereas Unpack will pull them off a floppy disk
Clicking on the preferences button will display a number of options;
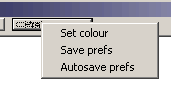
Set colour allows you to select a custom colour (eg your own SIGIL one) that will be used when you type in the formatted text area. This colour will not be coded into the HTML version of the text, so you can safely use any colour with out any problem.
The Save preferences saves all of the setable options within the program, including convert options and your custom text colour
By selecting (and thus checking) the Autosave feature, the Marketplace text changer will perform an automatic save when you shut the program down
This is the area where you actually type you post, it has the 'normal' set of shortcut keys such as Cut (Ctrl+X), Copy (Ctrl+C), Paste (Ctrl+V) and undo (Ctrl+Z).

Button explanation:
1 - Bold - Embolden's text
2 - Character name - Emboldens and blue's text (ONLY for purposes of addressing another person
3 - Italic - Makes text italic (for descriptive information)
4 - Bullet points
5 - Clear - blanks the main text area
6 - Save - allows you to save the main text area as a .txt or .rtf file
7 - Open - allows you to open a .txt or .rtf file
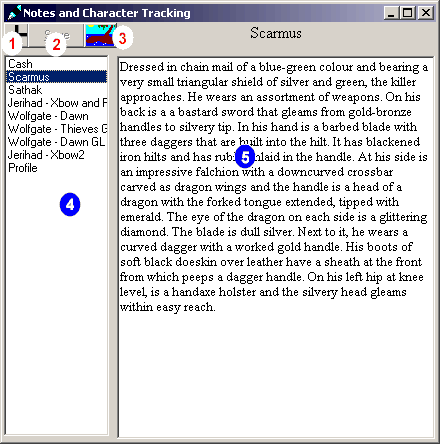
If you click the right-mouse-button on the Characters name button (2), then a window will appear;
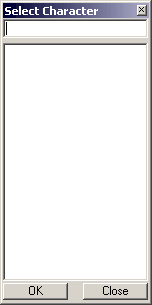
By typing in a characters name in the text box and pressing <return> this will add that characters name to the listing. By selecting a characters name and clicking OK, that name will be placed at the current cursor location in bold, blue text. If you have added any names to the list, you will be given the option to save the list, thus allowing you to create a list of people whom you have met and spoken to. Clicking the close button will close the list, but stilll give you the option to save, if you have added to the list.
Clicking the left-mouse-button on this will convert your formatted text into the HTML equivalent and place a copy on the clipboard. To use this copy, you need only place the cursor in the large text box on the appropriate board and press Ctrl+V to paste it in.
Clicking the right-mouse-button on the Copy and Convert button will bring up a menu that will allow you to specify an action to take after the program has sucessfully Converted and Copied your text;
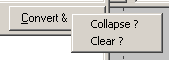
The Collapse option, when checked will automatically collapse the window down as if you had clicked on the collapse button. Equally the Clear option, when checked will clear the contents of the formatted text area, just as if you had clicked on the clear toolbar button. These two settings ARE saved along with your preferences
This is the area that the HTML code gets placed in when a user clicks the Copy and Convert button. You can change this if you wish and recopy to the clipboard using a right-mouse-button pop-up menu.